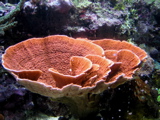
Orange Montipora Capricornis
This particular coral has proven to be hardy and fast growing. I purchased this coral in the summer of 2002, and it has since taken over my tank. I had to frag the coral considerably in 2004 because I couldn't clean the display panel without damaging it. I suppose that as far as tank problems go, this is a good one to have.

December 25, 2002
Approximately four inches in diameter.
As you can see, the coral was recently epoxied to the live rock.
|

September 26, 2003
Approximately eight inches in diameter
This picture was taken four months after the coral was relocated to my 180 gallon tank.
|

September 25, 2004
Approximately fourteen inches in diameter
The same coral almost two years later.
This picture was taken after I fragged of about 20% of the outer leaves.
|
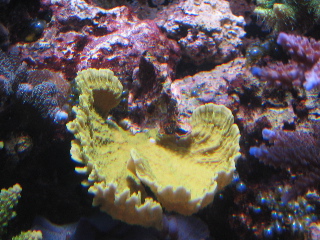
Montipora Capricornis (yellow)
I received this piece as a leftover frag. I mounted it in a vertical position, and it began to form a whorl. Unfortunately, some nearby star polyps began encrouching, and killed off a portion of the frag.
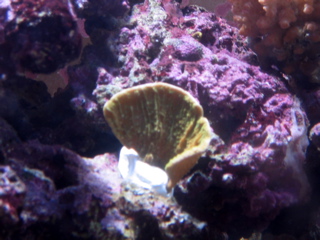
September 29, 2003
Initial planting of the coral fragment with epoxy putty.
|
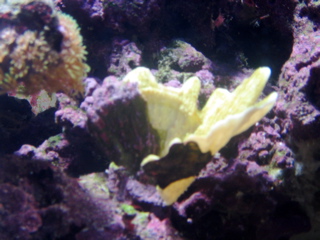
June 10, 2004
Notice how the star polyps have killed off the left portion of the frag.
|
February 27, 2005
The coral has now flattened out and is starting to take on the characteristic funnel shape.
|
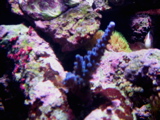
Acropora Tortuosa
I purchased this tortuosa frag in April of 2004 from a half inch cutting. I found that it took a considerable amount of time to really start growing; however, once it had encrusted its base growth began to take off.

September 29, 2003
The main branch is approximately half an inch
|

June 10, 2004
The main branch is approximately two inches
|
Tired of waiting for frozen food to defrost?
Items needed:
1. Small plastic bottle ( 300mL bottled water )
2. Cutting tool like scissors or a Dremel tool (recommended)
Fabrication instructions:
1. Cut the neck off the bottle so that a larger opening is created.
2. Using two cable ties, create a loop. Place the loop around the top of the water bottle, and tighten it so that the loop won't slip. Some water bottles have grooves, so place the loop in the groove, and tighten there.
3. Slip another wire tie inside the loop, and create another loop.
4. Tie off the previously created loop using a piece of string in order to prevent the feeder from floating away.
Operation:
1. Take a piece of string or cable tie and secure the bottle to a fixed portion of the tank, like the side. This will prevent the feeder from being blown around and causing a mess.
2. Fill the bottle with about two thirds tank water.
3. Invert the water bottle, and the bottle should float neck down without tipping over.
4. Once the bottle is stable, take frozen food and put it inside. Since it is frozen, it will float to the top. Once it has defrosted, it will fall through the neck, and into the water column.
One of my minor sins is to recommend things that I've yet to do myself. Shame on me. I really would like to try some of these recipies, but I'm just a little lazy. Here's some great sites where hobbyists share their homemade fish food recipies.
OzReef Marine Park: Reef Aquarium Food by DBW
About.com: Fish food groups, and which fish eat them
I feed my fish a "cocktail" of mysis shrimp, brine shrimp, phytoplankton, and cyclopeeze. It is worth mentioning that cyclopeeze is a godsend for the SPS reefers out there. The food comes in a frozen bar, and when defrosted it becomes fine food particles which are perfect for the SPS polyps to catch in the water column. It may no longer be necessary to target feed certain corals with the way cyclopeeze becomes evenly distributed in the water column.
Is your damsel causing you distress? Need to catch it but can't? Build yourself a trap!
Before you begin:
Ensure that you are adequately protected if you have venemous livestock living in your tank. This trap is best suited to slow moving fish like anthias and cardinal fish.
Items needed:
1. A plastic 32 or 64 oz container with a screw on lid. ( Costco size almond container or an A.R.M aragonite container are two examples). The important thing here is to have a large neck.
2. Scissiors, utility knife, or a Dremel tool (recommended)
3. A nail or a power drill (recommneded)
Fabrication instructions:
1. Remove the lid, and draw out a rectangle large enough for the critter that you want to trap.
2. Using the cutting tool, cut out the hole that will allow your soon to be banished critter to enter the trap. Don't make it too big or else the larger critters will take your bait. The hole should be cut off center if possible.
3. Using either a drill or a hot nail make punctures in the container on the half closest to the opening. This will allow water to drain out when removing the trap and forcing the critter away from the opening.
Operation:
1. Screw on the lid, fill with aquarium water, and orient with the lid facing toward the surface of the water. This will get all of the air bubbles out of the jug.
2. Invert the jug, and put in the food (frozen is best because it will float).
3. Place the trap on its side at the bottom of the tank.
4. Wait for the fish to enter the trap.
5. Reach in and remove the trap.
Before you drill a hole in acrylic be sure that you have an acrylic bit. If a standard drill bit is used, the acrylic won't actually be cut. Instead, the drill will be pulled into the acrylic, and the plastic will travel up the bit. Most likely you'll also crack the acrylic.
Here's what an acrylic bit looks like. They are a bit pricey, but they do the trick.
If you're using a hole saw, you probably won't need to worry about cracking the acrylic if edge of the hole saw is more than an inch away from the center. It's still adviseable to drill the center hole with an acrylic bit.
Some good diagrams and reference links
Drilling Acrylic
Drilling and Proper Handling and Maintenance of Acrylic
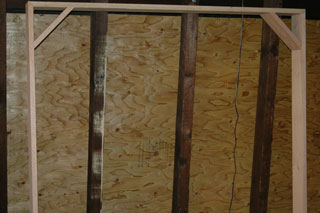
Framing
The canopy material was built from red oak purchased from home depot. The red oak had a 1" x 4" dimension, and were mitered using a power miter saw. This tool is absolutely key, as doing miter cuts by hand is both time consuming and inaccurate. Boiled linseed oil and a coat of varnish were the only finishes used. Linseed oil is both easy to work with, and brings out the wood grain without making the wood dark.
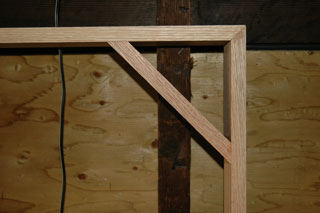
Framing Detail
The frame's corners were braced, and then then a horizontal slats were placed every twelve inches to provide additional rigidity, as well as a place to mount the lights. Finally, a vertical brace was installed to provide support for the horizonal slats.
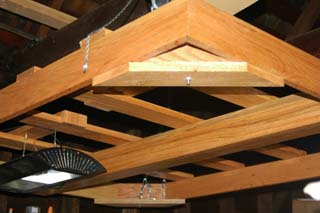
Hanging
The frame was hung from the rafters using steel chain, and spring loaded hooks (similar to those used in climbing).

Hanging Detail
A lamp has been hung to show what the ultimae goal will look like. Notice the use of eye hooks.
The Finished Product!

The Lighting Upgrade
In mid 2006, I decided to upgrade my tank lighting as I felt that the 250 watt lamps were not providing a cost effect solution to my lighting needs. Firstly, having six double ended metal halide lamps to replace every nine months was a bit painful to the wallet. Secondly and more importantly, I just wasn't getting the color out of the corals that I knew I could achieve with more intense lighting that favored the blue spectrum. The ultimate solution that I came up with was to remove the four 250 watt 10,000K MH lamps, and replace them with two 400 watt 20,000K MH lamps and four 54 watt actinic T5's.
The Equipment
Four Icecap 400 watt metal halide electronic ballasts.
Four Icecap 250/400 watt DE HQI metal halide pendants
Four Icecap 400 watt 20,000K DE HQI metal halide bulbs
One Icecap 250 watt T5 electronic ballast.
Four Geisemann True Actinic T5 lamps
The Original Canopy with 250 watt Lamps

Removal of the Canopy
After removing the oak canopy, I supported it on some chairs so that I could take measurements, walk around it easily, and position the lighting before I commited to drilling.

Drilling for the Metal Halide pendants
The metal halide pendants were positioned in each of the four quarters of the canopy. I used a combination of eyehooks and springhooks similar to the kind that mountain climbers use in order to make maintenance convenient.

Side Hanging View
The same view as above, but from the side. Since the canopy was supsended on the chairs, it allowed me to do a full mock-up before having to re-install it above the tank.

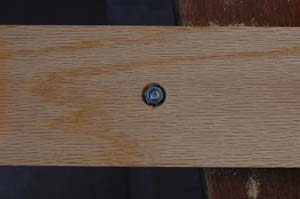
Countersink Detail
The requirement was to make both the T5 and Metal Halide lighting hang at the same height so that neither shaded out the other. I used a countersink bit to recess the nuts so that I could achieve this goal as well as create a cleaner finish.

T5 Lighting
Since the T5 bulbs are long and fragile, I decided to mount them on a board rather than directly to the canopy. The board itself is suspended from the canopy. The center board holds two 54 watt T5 bulbs, and the outer boards hold a single 54 watt T5 bulb.
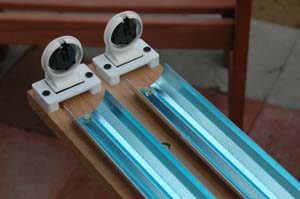

Center T5 Lighting Mount
The center T5 bulbs were hung from the canopy prior to mounting the metal halide pendants. Since the T5 assembly is a retro-fit kit, the wiring needed to be done in place. It's a source of frustration that there isn't an out of the box quick release kit like the metal halide pendants have. In the future, I may build one myself. Notice the open eye hooks approximately 25% from the left and the right sides. Those open eye hooks will be used to mount the metal halide pendants.


Metal Halide Installation
Notice how the lamps have the same height above the water to avoid any shadowing. The lights also fit snuggly together to avoid any wasted surface area for lighting.


The Finished Product
The final product consists of 1600 watts of 20,000K double-ended HQI lighting and 216 watts of T5 actinic lighting.

Close Up Pictures

Blue Tridacna Maxima Clam - 3 years in tank, 5, top view

Kaudern's Cardinal (Bangaii Cardinal)

Citron Goby (Acro Goby)

Euphyllia Jarninei - 5 years in tank, 12" fully opened
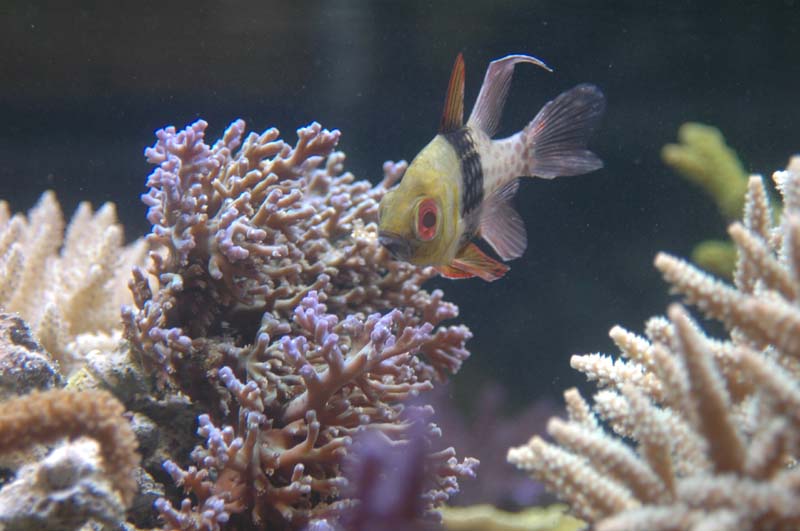
Pajama Cardinal

Various Acropora

Acropora Solitariensis

Clown Tang

Sohal Tang
Top view

Bulkhead holes - Despite my earlier recommendations regarding bulkhead holes (see standard drilling diameter), I failed to take my own advice. Now I have to make the holes wider using a special tool.

This hole saw has a special pilot called an Oops! Arbor. Rather than having a drill bit as the pilot, the special Oops! Arbot allows for the old hole saw to be used. Notice the thin cylinder it allowed me to cut in order to widen the hole. Honestly, I was sweating bullets when my bulkheads didn't fit. This thing really saved the day. Just remember, when drilling acrylic...GO SLOW, and don't apply too much pressure--otherwise you run the risk of cracking the acrylic.
375 Gallon SPS Tank
March 3, 2006
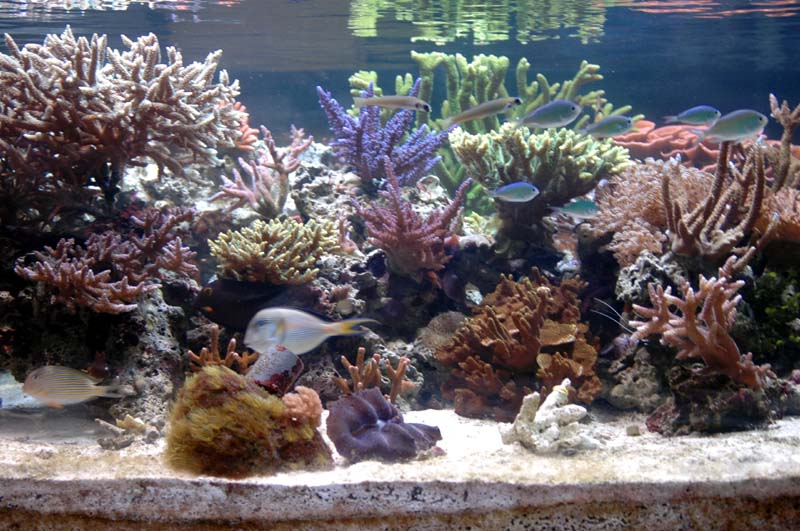
Left Side
Front Side

Right Side
375 Gallon SPS Tank
March 23, 2008

Re-aquscaped, and re-planted with new frags--Phoenix Rising.
December 25, 2006

This display crashed in January of 2007--70% mortality rate.
375 Gallon SPS Tank
March 23, 2008
Re-aquscaped, and re-planted with new frags--Phoenix Rising.
December 25, 2006
This display crashed in January of 2007--70% mortality rate.
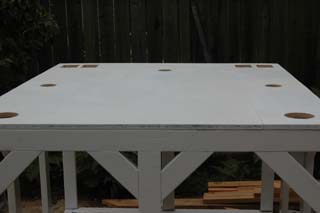
Top view
This is the top view of the stand before the holes were cut. Notice how large sheets of paper were used to identify where the holes should go. The holes were traced from the bottom of the tank onto the paper.

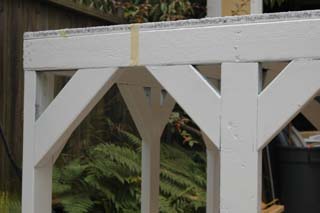
Corner Detail
The corners and the sides were braced so that the force coming down would be directed toward the vertical two by fours.
Isometric view
This stand was built from douglas fir, and painted using an oil based paint. The top is made from particle board. At a later point, I anticipate that I will use an oak veneer to finish off the tank. At this time, it is really low on my priority list.

Holes Drilled
The top of the tank after the holes were drilled. Holes were drilled with hole saws, and a jigsaw was used for the rectangles.
It's time to purchase the tank!
What questions should I be ready to answer?
Should the tank be made out of glass or acrylic?
When it comes to tank composition there are literally knockdown drag out fights over which is better. Like my political views, I'll take the middle ground and say that both are great, but each has it's pros and cons, and one needs to decide which inconvenince he or she is willing to live with.
Glass - Pros
Scratch resistance - In comparison with acrylic, glass is much harder to scratch, and assuming that the seals hold, one can keep your glass tank for a very long time.
Cleaning - This goes hand in hand with scratch resistance. One can use razor blades and powerful magnets to clean glass tanks. Try this on acrylic tanks, and soon you'll find that the clarity of the tank will decrease. This is not to say that you can't use magnets on acrylic tanks, but you just need to be careful.
Top access - Glass tanks typically don't require as large bracing on the tops of the tank as acrylic. This allows for more light to actually enter the tank, and allows for better access to the interior of the tank.
Cost - Glass tanks aren't nearly as expensive as Acrylic tanks, unless you opt for PPG's Starphire glass which is a glass-like material that has the clarity characteristics of acrylic.
Glass - Cons
Weight - As mentioned above, this is probably the reason that most people choose not to buy glass for large displays. Since I live in a multistory building, I'm concerned with the weight that I'm putting on the floor. The building doesn't need another elevator shaft.
Fragility - I've read horror stories on the Internet about people waiting months for large custom glass tanks only to find a crack after the shippers had left. It could be a flaw in the glass, poor craftsmanship, poor handling, whatever -- all you are left with is a heavy broken tank, and waiting for the shippers to come back between the hours of 9 a.m. to 5 p.m. What a coincidence! That's when I work too!
Clarity - Real glass has a green tint to it. Not really a big deal in my book, but some people want what they see in the local fish stores which are almost always acrylic.
Modifications - It's important to plan ahead, and have the tank pre-drilled before it arrives on site. If you find that you need to drill, then make absolutely sure that the glass pane that's being drilled is not tempered glass, otherwise your tank will look like the front door of an Urban Outfitters.
Acrylic - Pros
Clarity - Acrylic affords much better clarity and transmittance than normal glass.
Weight - Acrylic doesn't weigh nearly as much as glass does. I'll post some exact numerical proportions when I find some. This is probably the most compelling reason to buy an acrylic tank, and it was mine even the second time around.
Strength - Assuming that the solvent welds were done properly, the acrylic tank is essentially a single pice of acrylic (at east in theory). There isn't a need to worry about a pesky critter, like a mantis shrimp, shattering the tank, or seals that might degrade due to UV exposure.
Drilling - Acrylic is easily drilled for bulkheads. Said differently, one doesn't need to plan out every drilled hole before hand. No need to pay glass drilling experts to drill holes in your tank. Could you imagine having to haul a several hundred pound tank to a glazier, and then bringing it back?
For drilling holes in acrylic read this page.
Acrylic - Cons
Scratches - If you go to your local fish store, and really look hard at the acrylic tanks you'll see scratches, and even some frosting on the oldest of the tanks. It's a fact of life when buying acrylic, so be careful. If you chose to buy a magnet to clean the hard to reach spots, consider the thickness of the acrylic so that you don't buy one that's too powerful.
Cost - Acrylic tanks will cost you about two to three times that of standard glass, but are a little cheaper or about the same as PPG Starphire glass aquariums.
Many reefkeepers try to avoid acrylic, and prefer all glass aquariums; however, for my needs I find that the benefits of arcylic outweigh those of glass aquarium which I will describe below.
Which tank shape and dimensions should I pick?
Reef tanks come in all shapes and sizes, but the most common are rectangular. Hexagonal, cylindrical, and even spherical tanks can be found, but I suggest leaving those novelty items for the terrariums and goldfish tanks. Oddly shapped tanks are difficult to clean in a marine environment.
In the U.S., tanks are often sold in terms of gallons, shape, and whether they are "tall" or not. For example, a 120 gallon rectangular tank may have the dimensions of 48" x 24" x 24" (length, height, width); however, a 120T (tall) gallon rectangular tank would have the dimensions of 60" x 24" x 18". These have the same volume but drastically different dimensions.
Width is the most important dimension for reef tanks
If you are planning a coral reef tank, the most important dimension is the least obvious: width (front to back depth). A wider tank yields more aquascaping possiblities. Most experienced reefers if asked what they could change would say that they wanted a wider tank. At a minimum, twenty four inches should be reserved for width on reef tanks larger than 75 gallons.
In case you were wondering, the least important dimension is height. In fact, the taller the tank, the more expensive the materials are to build it. Tall tanks require thicker tank material in order to prevent bowing and rupture. Tall tanks also require more powerful lighting in order to get the best penetration to the bottom.
Is the thickness of the tank material important
With regard to glass tanks, the thickness of the glass is probably not important if you're not building it yourself. However, for acrylic tanks it's a different story. Acrylic has a considerable amount of tensile strength so tanks can be fashioned out of relatively thing material in order to save on cost.
For most tanks, 5/16" acrylic is used. Unfortunately, when the tank isn't filled with water one doesn't see the amount of bowing and distortion that the water will have on the tank. This bowing is emphasized dramatically on taller tanks which are 24 inches and taller. In order to alleviate this problem, 1/2" acrylic or thicker material should be used on tall tanks.
Thicker walls will prevent bowing on acrylic tanks
If larger openings are desired on the top of the tank, a very thick 1" acrylic may be used to prevent bowing. Most of the rigidity of an acrylic tank is supported in the top. Thinner materials will result in smaller openings on the top which translates into smaller rocks for aquascaping, and less light penetration.
What can I do to save money on the tank?
If you decide that you want a colored background, a way to save a few dollars would be to purchase a colored film. So rather than purchasing an acrylic tank with a blue or black background, you could instead by a completely transparent tank, and then buy an opaque film to cover the back and/or sides of the tank.
Where should my overflows go?
Over flow positioning is mainly an aesthetic thing. If the tank will be viewed from all four sides, then center-center overflows would be appropriate. Most people only have the front side available and possibly the sides. Depending on how many viewing panels are available one could put them dead center or more commonl
Centered - Useful for tanks where all sides will be viewable. These are commonly large rectangular tanks, hexagonal tanks, and cylindrical tanks.
Rear corner - Probably the most common overflow postition is to put it back in one or both corners. This keeps the overflows out of the picture. The overflows may act as a support for live rock.
Rear center - Similar to the rear corner, but in the center. It frees up the rear corners; however, it can cause the center of the tank to become pinched. If used as part of the aquascaping, a rear center overflow can act as a support for live rock.
Side - This orientation puts the overflow completely to one side of the tank which allows only three sides to remain visible or just two if both sides have overflows. This design is ideal for room divider tanks.
How large should the drain be in my overflow?
Typically this question is answered by considering the diameter of the pump that will be used to put water into the tank. A good rule of thumb regarding drains is to pick the next size up from the return pump's input. A 3/4" input will require a 1" drain, a 1" input will require a 1 1/4" or 1 1/2" drain. See the plumbing section for more on choosing pipe diameters.
Drain diameters should be larger than the pipe diameters that are feeding the tank
If it isn't possible to achieve a drain bigger than the input, multiple drains can be used. Under non-flooding conditions, one shouldn't worry about having too much drainage.
A bulkhead will need to be installed in the drain, so if you are drilling the hole yourself, don't forget to leave about 1" around the hole for the bulkhead. This rule depends on the manufacturer of the bulkhead. Always have your bulkheads before you drill because manufacturers may discontinue. It sounds far fetched, but I managed to buy one bulkhead with narrow threading one week only to discover that th next shipment was the new style of thicker threads which nolonger fit into the hole.
Always have your bulkheads before you drill
If you've never drilled your tank before, I recommend that you have a professional do this. If you have a glass tank, definitely find a glazier to cut the holes.
Regular tank chores
Daily
Visual examination of the livestock
Take a look at the livestock and make sure that there's not cyanobacteria forming, dead fish, or other indicators of poor tank health. Your eyes and their ability to detect day to day changes are the best monitoring device available.
Visual examination of the mechanics
Take a quick look around the tank, and make sure that there aren't any pools of water forming, powerheads are positioned properly, dosers are dripping, etc.
Wiping off the viewing panels
Every day or every other day, the viewing panels should be gently wiped down with an alage pad. Daily maintenance will ensure that purple coralline alage, diatom algae and other nuisance algae do not build up. For those who have acrylic tanks, be careful that sand, tiny snails or other abrasize object do not get between the alage pad and the viewing panel.
Topping off with DI water
The water level in the sump should remain as stationary as possible. Without some form of automatic top-off or dosing system, the water level will fluctuate. The addition of top-off water should be done relatively slowly, so as to not dilute the sump too quickly. Of course, too quickly depends on a lot of factors like flow through the sump, volume of water in the sump, and volume of the entire system.
One gallon of freshwater in 10 gallons of salt water has ten times the dilution factor as one gallon in 100. The best advice is to add slowly.
Weekly
Protein skimmer
Once or twice a week the skimmer collection cup should be emptied.
Viewing panels
Scrape off any algae growth that may have gotten away from you.
Monthly
Water changes
Anybody who's ever owned a fish tank knows that about once or twice per month a water change should be performed. Fortunately, for reef systems that don't have too many fish, a ten percent water change once per month seems to work well for most.
Big tanks equal big water changes. For those who wish to get large tanks, ten percent of 180 gallons is nothing to sneeze at. You're swapping out 144 pounds of water there, big boy! The 300 plus gallon tanks sizes typically have dedicated rooms to house the sump, as well as access to drains in order to facilitate water changes and top off.
Semi-Annually/Annually
Powerheads
Powerheads should be removed from the tank, and soaked in distilled white vinegar. Purple coralline alage should begin to detach from the surfaces of the power head. A plastic scraper or credit card can be used to remove any stubborn coraline. After the vinegar cleansing, run fresh water through the pump to remove/dilute any excess vinegar.
External Pumps
The external pumps should have their seals checked for leaks, and should have distilled white vinegar run through them for an hour in order to remove any debris on the impellers. After the vinegar cleansing, run fresh water through the pump to remove/dilute any excess vinegar.
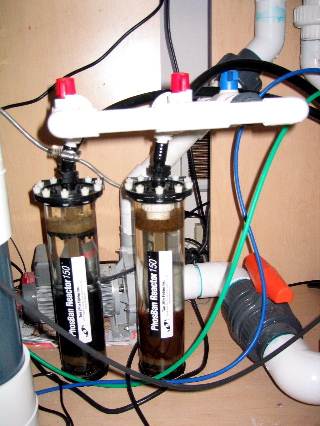
Carbon and Phosphate Reactors
The Problem:
I currently don't have an elegant way of running Carbon and Phosphate media in the tank. While I would like to have these running 100% of the time, having a filter bag with the media seems a little sloppy.
The Solution:
I purchased two Phosphate reactors from Two Little Fishies, and placed them in-line with the "maintenance T" that I created during my re-plumbing project.
The solution consists of two Phosphate reactors plumbed in-line with the return. The plumbing used is 1/2" plumbing so as not to drive too much flow through these reactors. It is important to gently suspend the Phosphate or Carbon media, but not to create so much turbulance that they disintegrate from colliding with itself.
Unions and ball valves were used unsparingly to facilitate maintenance, as media will need to be frequently replaced. Either chamber can be filled with Phosphate or Carbon media.
Challenges:
Maintenance of the Phosphate reactors from Two Little Fishies can be somewhat cumbersome. There are ten nylon screws that need to be removed whenever the media needs to be serviced. Also, the sponge filter inside the chamber tends to fill with detritus or small pieces of media which can cause the sponge to float. I had to place a piece of PCV pipe inside the top of the chamber to hold the sponge in place. If the sponger filter doesn't provide a barrier, some of the reactor media can return to the sump.
I suspect that one could easily perform a DIY project on this; however, to the credit of Two Little Fishies, they didn't charge a lot of money for the reactor (retail approximate USD $35 ).
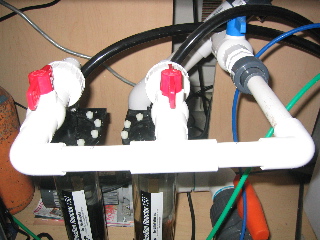
Ball Valves and Unions
Filtration Chambers
Return Plumbing
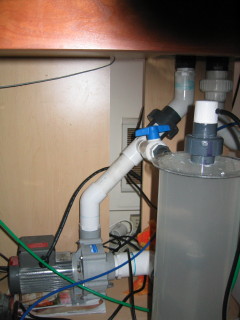
The Problem:
I currently have too many elbows in my return plumbing which is decreasing the head pressure. This is not a pressing issue, but I would like to fix it soon. I have these elbows in my system because of a combination of center overflows and a large sump. I will be upgrading my sump sometime in the near future.
The Solution:
I spent the better part of a weekend replumbing my return pump. Prior to making this change, I had my return pump plumbed into a "T" terminating into two 3/4 inch Sea-Swirls. I modified the stand side of the return so that only 45 degree angle fittings were used. This allows for a little more clearance in the stand for a larger sump, and reduces some of the friction that ultimately reduces head pressure.
The solution consists of a one and a half inch, 45 degree elbow joint coming out of the Sequence 750 pump. This leads to a "maintenance tee" that bushes down to one inch on the branch and terminates in a one inch ball valve. This "maintenance T" will be used to perform water changes or lead to activated carbon and/or phosphate reactors. The main leg of the tee leads to another 45 degree elbow which goes to the bottom end of the bulkhead.
The one inch ball valve facilitates easy water changes. In the past, I would use a Rio powerhead to pump water out during the water changes. The old process was clumsy due to the fact that I had to power off the return pump, and use the Rio powerhead to fill up one 5 gallon bucket at a time while unplugging the powerhead in between buckets.
On the tank side of the bulkhead, a vertical one and a half inch shaft leads to two 45 degree elbows, to make a softer 90 degree turn. The elbows lead to a one and a half inch ball valve. At the end of the ball valve, the pipe is bushed down to one inch that leads into a 90 degree elbow that goes down into the tank. Within the tank a 45 degree elbow is used to gently blow into a hard to reach spot.
Challenges:
The tank was been up and running for over a year; as a result, a considerable amount of detritus, sand, and corraline alage had accumulated in the bottom of the overflow. When I was re-adjusting the bulk heads, some of the year old grit settled between the bulkhead and the base of the overflow. This resulted in a slow drip from the bulkheads. It took much longer than I expected to clean out the grit so that I could make a watertight seal.
Once a tight seal was made, I continued on with replumbing the tank side return, and no issues were encountered.
Tank level

Sump level
Sump level - Maintenance T

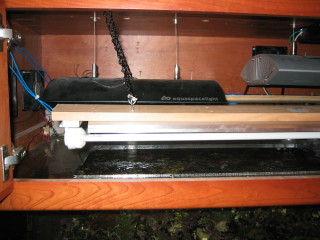
Replace Power Compacts with T5 Lighting
The Problem:
My current power compact lighting is positioned too high in my hood resulting in a shadow where the metal halide lumieres obscure their light. I would also like to move to higer wattage fluorescent lighting than my current dual 65 watt PC's.
The Solution:
I purchased an Icecap ballast capable of driving two five foot T5 bulbs, two actinic bulbs, a DYI T5 retro-fit kit, and reflectors.
I spent a weekend morning attaching the retro-fit kit to a couple of 2.5 inch wide boards that were approximately five feet long, and then suspending them in the hood with chains. Wood and chains were purchased at Home Depot. The wiring diagram provided by Icecap was adequate; however, not having done much electrical work before, I was a little scared to fire them on at first. They came up, and all was well.
Challenges:
Icecap Ballast - The Icecap ballast's relatively short wiring harness made it a little difficult to wire five foot bulbs. I had to mount the ballast in the center of the rear exterior of the hood in order for all wiring ends to meet their respective end caps. Also the retro-fit kit doesn't include wiring for the jumpering of multiple bulbs. I had to purchase some extra 16 gauge wiring (yellow) in order to complete the project.
Wiring - I'm not satisfied with how I dressed the wiring for the retro-fit kit. I will need to revisit this on another weeked.
T5 Bulbs - Five boot bulbs are difficult to install inside of a hood. I'm so glad that I didn't purchase the six foot ones.
View of front T5 bulb

Closeup of front T5 bulb
My current tank configuration
Tank
180 gallon TruVue acrylic made from 1/2" sheets. All sides are transparent, with a center back dual overflow. Two 1 1/2" bulkheads are used for the return plumbing as well as the drain.
Lighting
Lighting consists of three 250 watt Aqualine Buschke Aquaspacelight Mini lumieres. The bulbs currently in use are the Aqualine Buschke 10,000K bulbs. Actinic lighting is supplied by a pair of five foot 80 watt T5's powered by an Icecap ballast.
Filtration
The only mechanical filtration used at this time is a EuroReef 8-1 skimmer. This skimmer has worked flawlessly, and is exceptionally easy to maintain. Well worth the money.
Return Pump
The return pump is a Sequence 750 with the saltwater seals. The pump doesn't generate much heat, so I don't have to worry about the pump contributing to the water's temperature. Now if I could only say the same thing for the lights... My only complaint with this pump is that the inlet to the pump requires two inch PVC. This makes things like ball valves and unions quite expensive and hard to find.
Power Heads
Two Tunze Stream 6100's with the Tunze wave controller creates a powerful yet gentle flow. I wouldn't trade these in the for the world. They really reduce the need for a high powered return pump, and they move a lot of water. They can be too powerful at times. Fortunately, they can be tuned back so as not to create a tsunami. The only downside that I can see is that they are a little bulky in size.
Sump
30 gallon rubbermaid tub.
Top-off system
A DIY Kalkwasser reactor is fed by on old 10 gallon aquarium. A float valve is connected to the sump. When the water level drops enough for the float valve to fall, kalkwasser is slowly dosed into the sump. I can attribute the tank's rapid SPS growth to having this "kalk" reactor.
Calcium Reactor
I can't remember the brand, but it's a dual chamber reactor fed by a 5 pound bottle of carbon dioxide. The regulator on the C02 cylinder is German made. Always trust the Germans to make quality precision equipment.
Timelapse pictures from my tank
Timeplapse pictures from my tank
Montipora Capricornis
This particular coral has proven to be hardy and fast growing. I purchased this coral in the summer of 2002, and it has since taken over my tank. I had to frag the coral considerably in 2004 because I couldn't clean the display panel without damaging it. I suppose that as far as tank problems go, this is a good one to have.
December 25, 2002
Approximately four inches in diameter.
As you can see, the coral was recently epoxied to the live rock.
|

September 26, 2003
Approximately eight inches in diameter
This picture was taken four months after the coral was relocated to my 180 gallon tank.
|

September 25, 2004
Approximately fourteen inches in diameter
The same coral almost two years later.
This picture was taken after I fragged of about 20% of the outer leaves.
|
Acropora Tortuosa
I purchased this tortuosa frag in April of 2004 from a half inch cutting. I found that it took a considerable amount of time to really start growing; however, once it had encrusted its base growth began to take off.
September 29, 2003
The main branch is approximately half an inch
|
June 10, 2004
The main branch is approximately two inches
|
Montipora Capricornis (yellow)
I received this piece as a leftover frag. I mounted it in a vertical position, and it began to form a whorl. Unfortunately, some nearby star polyps began encrouching, and killed off a portion of the frag.
September 29, 2003
|
June 10, 2004
Notice how the star polyps have killed off the left portion of the frag.
|
Are you prepared for the recurring costs?
Energy - Large tanks will need plenty of light exposure to cover the surface area of the water. Lighting hardware are expensive to purchase, and expensive to run for eight to twelve hours per day. If you live in California, you really understand this fact. Powerful lights like metal halide lamps generate a lot of heat--enough heat to actually heat up the tank.
If the heat is too great, then you'll need to keep it cool with a chiller. It's just like fighting both sides of a war. As you can expect, chillers aren't cheap, and the compressor uses a fair amount of electricity. Heat can also be kept in check by using a fan to blow air over the sump; however, this results in increased evaporation.
Water - To combat the evaporation problem, you'll need to have plenty of deionized water on hand. That means lots of jugs of DI water, or a well designed DI unit. Reverse osmosis/deionized water can be purchased at your local fish store, or can be filtered at home. Most RODI units run about $200-$300. DI water can be purchased for about $0.50 per gallon.
Likewise salt water can be purchased or mixed yourself with your own DI water and salt mix. Consider a budget of no more than $1.00 per gallon for saltwater if you purchase it.
Light bulbs! - Oh yeah, these ain't cheap either. Metal halides bulbs can run anywhere between $85 to $250 per bulb depending on the type. You should probably change these out every 9-12 months. Fluorescents cost about half as much but you need to change them twice as often as metal halide bulbs in order to maintain the proper frequencies of light.
Fish food - You've got hungry mouths to feed. Fortunately, this isn't a great expense. Costs can be reduced further by making the food yourself.
Is an aquarium right for you?
I often meet people in their late teens and early twenties who are interested in getting a reef tank. My inclination is to talk them out of the big stuff, if not trying to talk them out of it completely. Fish tanks are like massive social life anchors--forget about long vacations, extended work travel, or moving with ease. There's always time in one's life to start this hobby. Why rush it?
Final words
If I haven't scared you off yet (and I hope that I haven't), I can say this for sure: If you're willing to put up with all the inital frustration of learning, can tolerate the loss of livestock, and get over spilling copious amounts of water on your carpet or hardwood floors, you will almost certainly enjoy this hobby. For those of us who live in big cities, it may be the only opportunity for us to have some form of living "garden".
180 Gallon SPS Tank (decomissioned)
February 25, 2005
Left Side
Center

Right Side

180 Gallon SPS Tank (decomissioned)
February 25, 2005
Left Side
Center
Right Side
Some interesting odds and ends
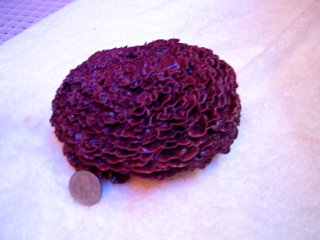
Holy corraline algae!
I had a particularly large piece of corraline algae growing on a rock which broke off when I was cleaning the display panel. I ended up placing it in a remote corner of the tank where it just kept growing. As you can see, it has grown quite large. For those of you not familiar with the size of a U.S. quarter, the coin is approximately 2 cm. in diameter.

July 10, 2004
Top angle
|
July 10, 2004
Side angle
|
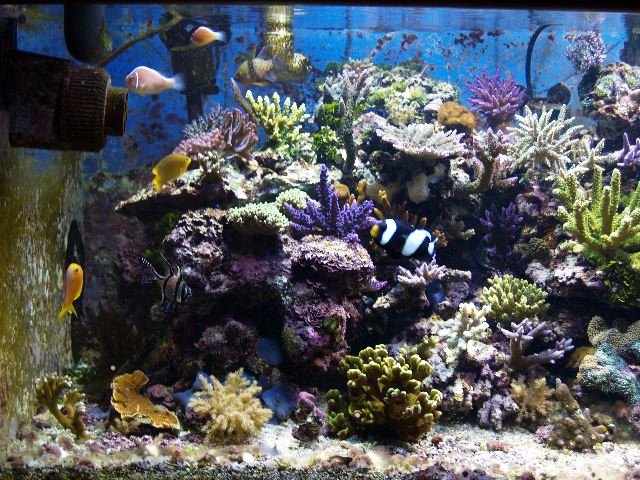
Tank Pictures
February 25, 2005
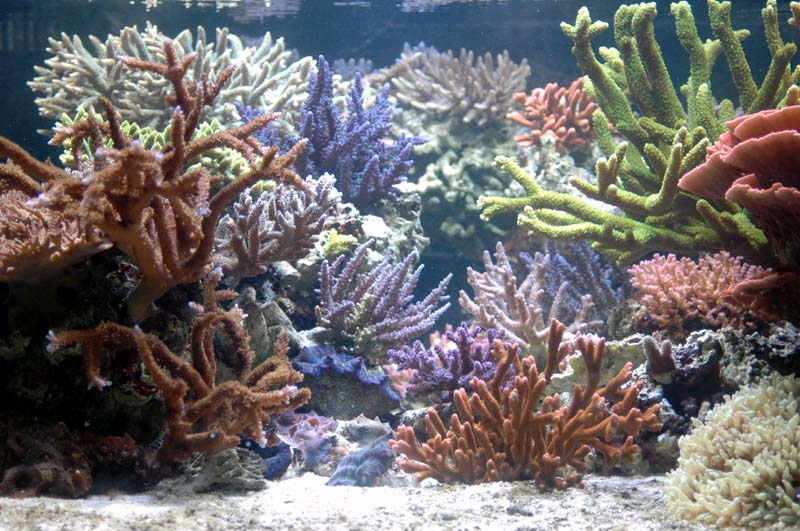
Acroporas Galore!

Millipora, Abrolhensis, Ricordeas, Pocilliopora

Clam, Ricordeas, Pocilliopora, and Maze Brain

Montipora Capricornis and Green Carpet Anemone

It's time to plumb the tank!
Reef tank plumbing can be as simple or as advanced as the hobbyist wishes to make it. For the purposes of this document, simple designs will be discussed.
What are the parts that need to be plumbed?
Sump - The sump is merely a resevior that holds the overflow water from the tank. It should be kept filled enough that the return pump doesn't pull air, but empty enough that if the power goes out your tank won't empty into your sump or worse - your floor.
Return pump - The return pump's function is to put water back into the disply tank. The diameter of the pump's pipe should be less than the total of the drain pipes.
This pump is often used to create current in the display tank, and it is recomended that it have the ability to turn over the volume of the entire tank at least once per hour. In addition to providing return water and current to the display tank, return pumps can also be used to run protein skimmers, in-line chillers, and/or refugiums if they are sufficiently powered.
Return drain - This is a simple bulkhead placed inside the hole in the overflow. It should lead to the sump, and be neither too long nor have too many elbows which would restrict flow.
What plumbing components are commonly used and how are they used?
Bulkhead adapters - Commonly called tank adapters or just bulkheads, these expensive plumbing parts mate a flat tank wall into a pipe. They come in two flavors, threaded or solvent welded necks. The end outside the tank is threaded. Typically, slip necks will do for reef tank needs because a pipe is rarely placed in this end except when used in an overflow.
Unions - One of the most important parts for reef plumbing. It isn't neccessary to use these when initally plumbing the tank; however, if you intend to make the plumbing maintainable it is required.
Valves - Ball valves are the most commonly used valve to stop or throttle water flow. Ball valves are best used in an on/off mannger. The other common valve is the gate valve which is best used to throttle flow in a more precise manner than a ball valve could.
Union valves - This expensive plumbing component combines a ball valve with two unions on either end in a small package.
Can you provide a plumbing example?
With any plumbing application on a reef tank, maintainability needs to be kept into consideration. Simply put, nearly all of the plumbing should be able to be dismantled and reassembled without any loss of material.
A bulkhead will be fastned to the sump. A union and a ball valve should be plumbed close to the bulkhead, so that flow can be stopped prior to making any detachments. The ball valve should be as close as possible to the thing you want to isolate like the sump or pump. From the other side of the union/ball valve combo a pipe or hose should be connected to the pump's intake. Even better would be to have a second union/ball valve combo connected, once again as close as possible, to the pump's intake so that the pump can easily be removed from the system for maintenance.
Unions and ball valves allow for easy isolation and removal of plumbing sections
From the pump's output, use at least one union to between the pump and the pipe or hose leading to the display tank. A ball valve somewhere between the display and the pump's output might be desired if you wish to throttle flow. Never throttle flow at the input, and never throttle more than 50 percent.
What other general guidelines can you provide?
Keep the number of elbows in the system to a minimum. Too many elbows, especially at the input or output of pumps creates a lot of turbulance and friction which reduces the power of the pump.
Do not assume that bulkheads have a standard drilling diameter. Bulkheads are produced by different manufacturers, and thus have different outside diameters.
Buy more plumbing components than you need. I wasted a lot of time driving back and forth to Home Depot for the odd piece here and there.
Where can I purchase plumbing parts without spending a lot of money?
In general, most elbows, tee's, ball valves, and PVC pipes can be purchased at any hardware store like Home Depot. For the specialized pieces like bulkheads, unions, and especially union ball valves, lower prices can be found by shopping on-line.
I've purchased parts from Savko. They have low prices and a user friendly website.
Completed Projects
Return Plumbing
- Remove the 90 degree angles, and make water changes easier.
Phosphate and Calcium Reactors
- Add a Phosphate Reactor and a Carbon Reactor
Fluorescent Lighting
- Replace PC lighting with T5 lighting, and put new lights at an even level with the metal halides.
Future Projects
More pictures for this website!
'nuff said.
Tunze Stream Power Heads
I'm considering getting a couple more, but their price tag might make it prohibitive.
Sump
I'm going to take a shot at making my own sump. If I do, I will put it in the DIY section of the website.
Calcium Reactor
I'm in the process of spec'ing out a new calcium reactor. The current one was purchased for my 120 LPS tank, and I don't think that it is keeping up with my 180 sps and clam tank.
Clean up cabling, tubing, etc.
I'm probably not the only person out there that has haphazardly wired, tubed, and cabled their system. I'm more inclined to do this after I've completed my other major projects.
What size tank do you want?
The biggest one possible, right? Well it's not that simple... Water weighs 8 pounds per gallon, or one kilogram per liter. A 100 gallon tank will weigh about 1000 to 1200 pounds once sand, rock, sump, stand, and its contents are taken into account. Floor strength needs to be taken into account, as well as location because once it is filled, it will be difficult if not impossible to move.
For the purposes of this document, a large tank is considered to be any tank that is 150 gallons or greater. At 150 gallons, it can be assured that entire setup should weigh over one thousand pounds (450 kg).
As tanks increase in size, certain factors that were negligible for small tanks begin to appear. One of the most noteable is humidity. Large tanks evaporate a considerable amount of water. This water may find its way into your walls or ceiling which will eventually cause structural damage.
It can be said with great certainty that as tank volume increases, the price will increase exponentially.
Which tank shape and dimensions should I pick?
Reef tanks come in all shapes and sizes, but the most common are rectangular. Hexagonal, cylindrical, and even spherical tanks can be found, but I suggest leaving those novelty items for the terrariums and goldfish tanks. Oddly shapped tanks are difficult to clean in a marine environment.
In the U.S., tanks are often sold in terms of gallons, shape, and whether they are "tall" or not. For example, a 120 gallon rectangular tank may have the dimensions of 48" x 24" x 24" (length, height, depth); however, a 120T (tall) gallon rectangular tank would have the dimensions of 60" x 24" x 18". These have the same volume but drastically different dimensions.
If you are planning a coral reef tank, the most important dimension is the least obvious: depth. A deeper tank yields more aquascaping possiblities. Most experienced reefers if asked what they could change would say that they wanted a deeper tank. At a minimum, twenty four inches should be reserved for depth on reef tanks larger than 75 gallons.
In case you were wondering, the least important dimension is height. In fact, the taller the tank, the more expensive the materials are to build it. Tall tanks require thicker tank material in order to prevent bowing and rupture. Tall tanks also require more powerful lighting in order to get the best penetration to the bottom.
Additives and Alkalinity
Additives
Supplementing reef tanks with additives is a hotly debated topic with extrememly knowledgeable people on either side of the issue. I tend to limit myself to adding chemical compounds that will ultimately contribute to high alkalinity and stable pH. The exceptions to that rule are iodine and strontium which I add weekly.
Currently, I dose Kalkwasser as my top off water, and add magnesium ion, and use Phosban to filter out phosphates in order to maintain my alkalinity. Beyond that, I add iodine ion for my clams and strontium for my coral.
Alkalinity *
Alkalinity is the buffering capacity of the water, and is directly linked both the calcium ion content of the water as well as the pH. Alkalinity is directly proportional to the amount of free carbonate (CO3-) and bicarbonate (HCO3-) ions in the water. Said another way, alkalinity refers to the hardness of the water.
Why do I want high alkalinity in my tank?
There are many answers to this question, and I will outline a few.
1. As stated before, alkalinity refers to the acid buffering capacity of the water. In laymans terms, buffering capacity can be thought of as a resistence to pH change, in this case low pH. If the pH goes too low (becomes acidic), then the buffering ions, carbonate and bicarbonate, are consumed in order to prevent a pH swing.
2. Corals require both calcium and alkalinity in order to build their skeletons. Calcium and alkalinity contributing ions are delivered to the reef tank via two part additives like B-Ionic, calcium reactors, or a combination of both. By driving up the alkalinity, a greater amount of calcium ions can be safely accomodated in the water without the risk of the water becoming too acidic. A low amount of alkalinity indicates that the system is consuming too much calcium carbonate, and growth of the stony corals and clams will slow.
By driving up the alkalinity, a greater amount of calcium ions can be safely accomodated in the water...
3. Higher alkalinity will improve the color of the SPS coral.
Can I have too much alkalinity in my tank?
Yes. However, should carbonate become supersaturated beyond the point where the ions can stay free in the water, the carbonate ions will combine with calcium ions and precipitate, or become solid limestone. This is not a terribly dangerous consequence, but the tank parts will become coated in calcium carbonate. This is commonly observed by the owners of washing machines, hot water heater elements, or dishwashers, where the parts become covered in limescale.
Can I have too little alkalinity in my tank?
Yes. This is the more dangerous scenario. Too little alkalinity translates into less resistance to pH swings. If the pH of the water drifts too low, then the health of the tank is at risk. As pH lowers, aragonite (solid calcium carbonate) begins to dissolve in order to compensate for the water's acidity.
How do I maintain my alkalinity?
The easiest way to maintain alkalinity is to use a calcium reactor. A calcium reactor bubbles carbone dioxide gas through calcium carbonate effectively creating carbonic acid (soda water). This carbonic acid dissolves the carbone reactor media (aragonite), and forms the calcium and carbonate ions that we desire.
How do I boost my alkalinity?
Another way to increase alkalinity is with a kalkwasser reactor. Also called a Nielsen reactor, the 'kalk reactor keeps a saturated calcium hydroxide ( CaOH ) mixture in suspension so that the useful portion of the mixture can form at the top of the reaction vessel. Used in conjunction with an automatic top off mechanism, a 'kalk reactor can provide a safe and reliable method of pushing alkalinity levels beyond conventional levels.
What other factors could be inhibiting my alkalinity?
This is not so much a question of adding more carbonate, but more a question of, "How can I use my calcium and carbonate ions more efficiently?"
1. Magnesium - Proper magnesium ion concentration will prevent the precipitation of calcium carbonate. Magnesium ions will "block" other cations like calcium from attaching to carbonate and bicarbonate which would cause precipitation, and thus render the calcium and carbonate ions useless.
2. Phosphates - High phosphates will contribute to the consumption of carbonate through phosphoric acid. Recall that carbonate is a base, so any acidity that is introduced will be consumed by the carbonate. On a side note, phophates are contributors to hair algae which is just another reason to keep the concentration of this ion as low as possible.
Reference material
Randy Holmes-Farley has written extensively regarding reef chemistry. Here are a few of his articles.
Chemistry and the Aquarium - What is Alkalinity?
Chemistry and the Aquarium - The Chemical and Biochemical Mechanisms of Calcification
Footnotes
* In this context alkalinity is actually the water hardness, and should not be confused with the term for a solution with a pH higher than 7.
Maintaining Proper Salinity Levels
Initial water calibration
When the tank is setup, the salinity of the tank should be measured with a hydrometer such that the water has a specific gravity between 1.020 - 1.025. Personally, I like 1.023 because it's easy to remember like 1,2,3.
If it is too high, then remove some water, and add de-ionized water, and then wait for about an hour to equilibrate, and then measure again. Just remember to go slowly.
If it is too low, then just add salt water. I recommend using just premixed 1.023 specific gravity sea water, but if the measurement is really far off then a stronger mix of saltwater may be necessary. Once again, go slowly, and give the water time to equilibrate.
Once the salinity is at a stable level, measure the water line in the sump. This should be roughly at 50% of the sump's total volume. Just remember to leave enough water space in the sump for excess water if the power should go out. Either make a mental note of the water line, or better yet, use a marker and mark the fill line as "MAX". This maximum fill line will be used to maintain the salinity of the tank. From now on, it is safe to assume that the MAX Line represents "Natural Salinity of Sea Water".
...the MAX Line represents the "Natural Salinity of Sea Water"
Periodically, the salinity at this line should be measured in order to verify that this line actually does represent the proper salinity. If it doesn't then adjust the salinity using the method above. For large tanks this shouldn't be a common occurance.
Evaporation
Water will evaporate from the tank throughout the day, and even more so with the lights on. In order to maintain the salinity, the water level needs to stay at the MAX line mentioned above. Fill the sump with de-ionized water so that the water level stays at the MAX line. Do not use salt water for top off, otherwise the salinity of the water will go up!
When salt water evaporates, the water portion goes away, but the salt remains. As a result, the salt water becomes more concentrated, and it needs to be diluted by topping off with de-ionized water.
Never top off with salt water!
Water Changes
No more than fifteen to twenty percent of the water in a tank should be changed on a regular basis for a healthy tank. Replacing too much water an any given time can upset the pH and temperature of the tank.
Before performing any water changes, make sure that the water line in the sump is at the MAX line mentioned above. Next, count the number of gallons of clean sea water that you will have for the water change. Knowing the number of gallons of clean sea water, remove exactly the same amount of water from the sump. The removal of water from the sump should be completely done before the addition of any water.
For example, if you have ten gallons of clean sea water, then remove ten gallons of water from the sump, and then add the ten gallons of clean sea water. Do not remove five gallons, then add five, then remove five, and add five. Doing so will not affect the salinity of the tank; however, it will reduce the effectiveness of the water change.
Replacing too much water at one time can upset the chemistry of the tank.